
Git
Version Control System - VCS
Usually software is versioned during development and maintenance. Here a VCS is used, which offers the following possibilities:
-
Archiving of all project statuses in order to be able to undo them for the purpose of accidental changes.
-
Coordination of the development team's shared access to the source code. Changes are recorded by name of developer.
-
Simultaneous work on several development branches of a project, e.g. production and development.
Git

Git is a free, widely used VCS whose development was initiated by Linus Thorwalds in 2005.
https://git-scm.com/
Start Git Bash
Configure Git
After the local installation of Git, the most important settings are made once for all projects:
$ git config --global user.name "forename surname"
$ git config --global user.email user@mydomain.com
Create a local repository
First, an empty repository with the name "test" is created:
git init test
Putting a file into the repository (track a file)
As a test, a file "first.txt" with some text in the directory "test" is created.
After that the instruction
git status
informs that the file is not yet tracked by Git (untracked file). For this, it must first be added to the index (so-called stage):
git add first.txt
(Alternatively, wildcards such as git
add *.txt
can be used.) A single dot tells GIT to add all the files: git
add .)
git status
now states a changed status and that the new file is added to the stageing area and now is ready for committing. Which has to be done with the following command:
git commit -m 'first version of project'

Fig. 2: Putting files into the repository
git status
now indicates that nothing needs to be committed to the repository.
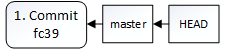
Fig. 3: 1. Commit
By default, the version branch is named "master". The HEAD (capital letters!) points to the current version. Git does not use sequential numbers for internal management, but a hash value that changes to the previous commit (for simplicity, only the first 4 characters are shown).
Änderungen in Repository einpflegen
first line
second line
third line
We also change the text in "first.txt".
git status
tells us to add the modified file "first.txt" and the not yet tracked files in "subfolder" so that a commit includes them:
git
add .
adds all new and changed files.
(git add *.txt would not include the files in "subfolder".)
git commit -m 'second version'
commits the changes in the repository.
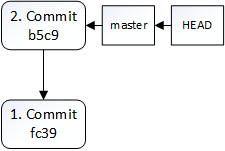
Fig. 4: Repository after 2. Commit
The second commit refers to the first one.
Restore previous version
A checkout can be used to restore individual files or entire complete program versions.
git log --graph --full-history --all
* commit b5c9d0e8abe60a5589cb24e52d87e183ac2265de
| Author: forename surname <user@mydomain.com>
| Date:   Thu May 26 11:43:17 2016 +0200
|
|     second version
|
* fc3929931d94c232605155280cfb2bc6a53befac
  Author: forename surname <user@mydomain.com>
  Date:   Thu May 26 10:22:47 2016 +0200

      first version of project
A checkout can then be done:
git checkout fc3929931d94c232605155280cfb2bc6a53befac
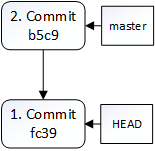
Fig 5: HEAD nach 1. checkout
git checkout master
Branch program version
Parameter -b stands for branch.
git checkout -b bugfix
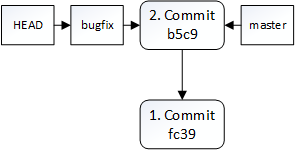
Fig. 6: Branching after checkout
The code in "second.txt" is now changed:
first line
second line changed (bugfix)
third line
git commit -am 'fixed bug'
(The -a (add) parameter causes all files to be added first and then committed to the repository.)
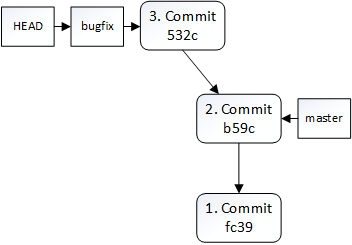
Fig. 7: After the 3rd commit in the branch bugfix
But in the meantime, another developer has often continued working on the master branch in the same file. He changed the code to "second.txt" as follows:
first line
second line changed (master)
third line
We simulate this by switching to master, entering and saving the change:
git checkout master
Enter change!
git commit -am 'third version'
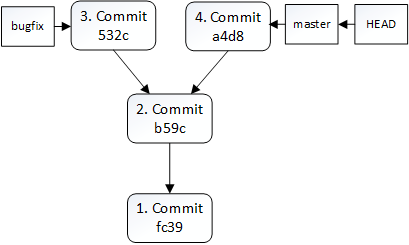
Fig. 8: Change in the master branch in the meantime
Merge program branches again
The bug has been fixed, but this branch now has to be integrated into the productive master branch. For this you have to switch to the master branch, if you have not already done so:
git checkout master
Then follows the integration:
git merge bugfix
Because the same line was changed in different branches, there is a conflict that needs to be resolved manually. The content of "second.txt" is:
first line
<<<<<<< HEAD
second line changed (master)
=======
second line changed (bugfix)
>>>>>>> bugfix
third line
The section between <<<<<<<
HEAD and
=======
are the changes to the master branch. (It was switched by checkout before merging in this branch.) The part below it up to
>>>>>>>
bugfix
refers to the changes of the bugfix branch.
To solve the conflict, you decide on one of the two parts or replace the whole section completely.
Then the file has to be committed:
git commit -am 'fourth version (bug fixed)'
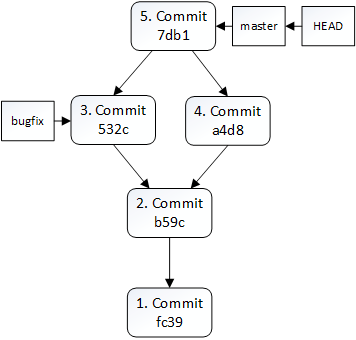
Fig. 9: After merging the branches
Delete branch
git log --graph --full-history --all
It is possible to simplify the call of long commands by the definition of an alias.
Recommended definition of the alias "tree"
git config --global alias.tree 'log --graph --all –pretty=oneline
--abbrev-commit --decorate'
Call:
git tree
--graph creates a graphical representation of the branches using ASCII-Art.
--all ensures that other branches are also displayed (for example, in Fig. 8, the 3rd commit would not be displayed without it).
--pretty=oneline
represents each commit in one line only. This improves clarity considerably, especially if there are more than a few commits.
--abbrev-commit
truncates the hash values of the commits from 40 to 7 characters, because the complete hash value is nearly never needed.
--decorate inserts some markers that tell you which branch points to which commit.
The branch bugfix can now be deleted:
git branch -d bugfix
Connect external repository
To be able to work on a code base in a team, the code must be synchronized with a remote repository.
https://git-scm.com/book/en/v2/Getting-Started-About-Version-Control (29.05.2019)
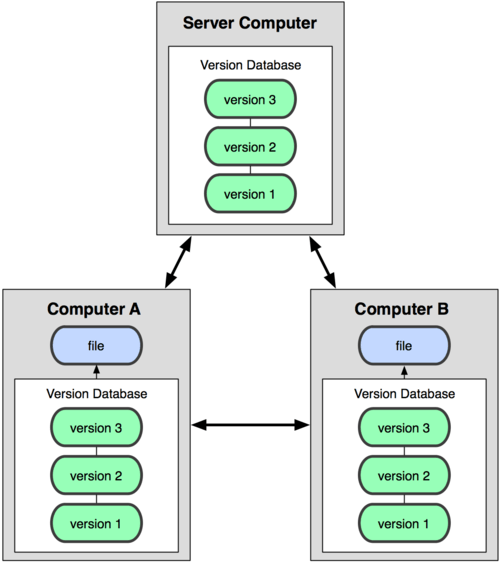
Fig. 10: Connection to server
Add remote repository:
git remote add origin https://github.com/yourUsername/test.git
origin is the short name that is assigned to Git by default for the server.
You may need to configure a proxy. (Not necessary at our institute):
git config --global http.proxy https://ipadress:port
Remote repositories can be viewed with:
git remote -v
Upload changes to a remote repository
After the connection has been made, a branch can now be uploaded to the remote repository:
git push origin master
Clone remote repository
git clone https://github.com/ateachment/test.git
Download and merge changes from the remote repository
Changes from the previously cloned repository are downloaded with:
git fetch origin
To connect the download with a merging, use:
git pull origin
Exclude files and directories from synchronization
Of course, binary files or e.g. configuration files of the IDE have to be excluded from synchronization. This is done with a file named ".gitignore" in the project directory.
Creating this .gitignore file can be very time-consuming. Finished files are available on the WWW, e.g. here for IntelliJ IDEA: https://github.com/github/gitignore/blob/master/Global/JetBrains.gitignore (29.04.2019)
Assign version numbers
Important versions, such as releases should be marked with a version number, which facilitates the management of the commits.
git tag v0.0.1
Other ways of tagging: https://git-scm.com/book/en/v2/Git-Basics-Tagging (29.04.2019)